Become the person, who referred the largest number of new users till the end of June 1, 2018 and we will give you 0.3 BTC.
Second place gets 0.2 BTC, third place - 0.1 BTC.
We are also going to give away 0.01 BTC extra prizes for 30 random users who will participate in this promo and invited at least two active users in promo period.
Wanted to follow up and see if you have claimed your free tokens in this brand new ICO Airdrop which started few days back and has only 26,845 tokens left at the time of writing this email
You get 5 free tokens worth $0.60 cents each = $3 for creating a free account and 5 free tokens for every free referral you introduceThese tokens will easily 100x by end of 2018 and will be worth minimum $300
Then go inside your members dashboard under marketing tools and grab your free token giveaway referral link and start advertising and get more free tokens
Then go inside your members dashboard under marketing tools and grab your free token giveaway referral link and start advertising and get more free tokens
Biedt
ongeveer dezelfde mogelijkheden als Facebook, maar legt grote nadruk op
privacy. ,,In Diaspora ben je zelf de eigenaar van je informatie,”
stelt het sociale netwerk. Gebruikers hoeven verder niet hun echte
identiteit te gebruiken. Daarnaast is het een decentraal netwerk en
worden persoonlijke gegevens niet opgeslagen op grote centrale servers.
Je kunt zelf kiezen op welke lokale servers (pods) je data worden
bewaard. Info: Diasporafoundation.org.
Nadelen:
telt weliswaar 650.000 gebruikers, maar dat is een schijntje vergeleken
met de ruim 2 miljard leden die Facebook heeft. Een sociaal netwerk
staat of valt bij het aantal gebruikers. In die zin heeft Diaspora het
predikaat van potentiële Facebook-killer nog niet waargemaakt.
Alternatief voor Facebook: Ello
Neergezet
als anti-Facebook en in 2014 korte tijd een hype toen Facebook destijds
een periode negatief de krantenkoppen haalde. Veel mensen haakten
echter af nu Ello vooral om berichten draait en veel functionaliteiten
van Facebook mist. Denk aan het opslaan en tonen van foto’s en het
organiseren van evenementen.
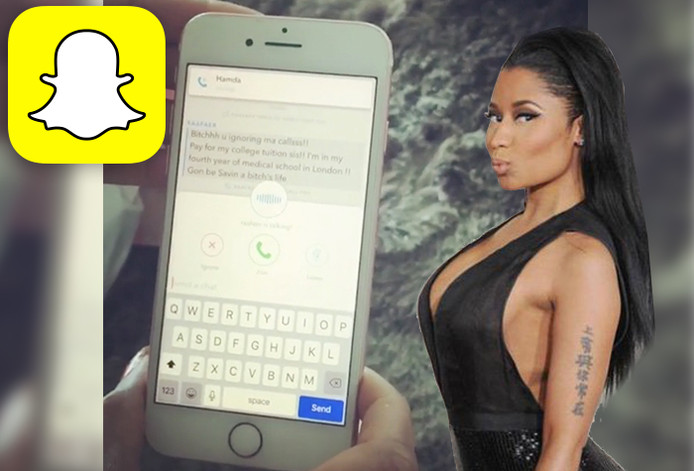
Alternatief voor Facebook: Snapchat
Een
ander sociaal medium dat hoopt te profiteren van Facebook’s problemen
is Snapchat. Raakte de dienst recent leden kwijt doordat Instagram
(eigendom van Facebook) lustig populaire functionaliteiten kopieerde, nu
lijkt die trend te keren.
Snapchat geldt met zijn
zelfverdwijnende berichten als iets privacyvriendelijker, gebruikt geen
algoritmen om gebruikers op bepaalde content te laten klikken en is tot
nu toe ook niet geplaagd door nepnieuws.
De vraag is uiteraard
of dit zo blijft: juist vanwege het voorgaande slaagt het medium er
minder goed in om geld te verdienen. Momenteel wordt druk gepoogd meer
in de smaak bij adverteerders te vallen. Zo liggen er naar verluidt
plannen om gebruikers hun profielen te laten koppelen met derde
partijen.
Alternatief voor WhatsApp en Facebook Messenger: Signal of Telegram
Volgens
de Consumentenbond het beste alternatief voor WhatsApp, de
berichtendienst van Facebook. Biedt end-to-end encryptie en de sleutel
wordt niet op de servers van Signal opgeslagen, maar op de smartphone
van de gebruiker zelf. De software is open source, zodat iedereen de
makers (Open Whisper Systems) kan wijzen op fouten of bugs.
Telegram
Messenger is de berichtendienst van Pavel Durov, de man achter
Rusland’s eigen Facebook VKontakte die na ruzie met de autoriteiten zijn
land ontvluchtte. Telegram is al langer populair bij mensen die hechten
aan privacy. Zo biedt de dienst de mogelijkheid tot ‘Secret Chats’:
versleutelde gesprekken die enkel op het toestel van beide
gesprekvoerders worden opgeslagen en na afloop zichzelf verwijderen.
De
dienst is overigens verwikkeld in een strijd met de Russische overheid
die namens de geheime diensten toegang eist tot versleutelde gesprekken.
Telegram weigert dat, momenteel loopt een rechtszaak in Moskou.
Wisselen
van berichtenapp is in ieder geval gemakkelijker dan wisselen van
sociaal netwerk. Per vriendengroep kun je immers met zijn allen
besluiten over te stappen.
Alternatief voor Google Chrome of Internet Explorer: FireFox
Hoewel
mainstream-internetbrowsers tegenwoordig eveneens een privémodus
kennen, vindt niet iedereen dat genoeg. Of men vertrouwt partijen als
Google of Microsoft niet.
Een
goed alternatief voor Chrome of Internet Explorer is FireFox van
Mozilla, in het vorige decennium één van de populairste browsers maar na
de komst van Chrome overschaduwd. Qua privacy-bescherming is het echter
een uitstekende keus. FireFox is een open source browser die als eerste
de optie ‘do not track’ standaard aanzette en uitgebreide
privacysettings kent. Zo kunnen cookies en ads worden geblokt.
Where do you have to invest in crypto coins?
Indeed there are at the moment thousands of crypto's!
At the first online Crypto Indexyou will get it all in control!
Voor
wie FireFox te mainstream vindt zijn er browsers als Brave of Epic
Privacy Browser, dat een geïntegreerde proxyserver kent, waardoor het
werkelijke IP-adres van de gebruiker onbekend blijft. In ruil voor
uitgebreide privacy-protectie levert de gebruiker echter wel in op
bepaalde punten (bijvoorbeeld gebruiksvriendelijkheid of snelheid).
Meest
geliefde browser voor privacy watchers is Tor. De browser is een
getweakte FireFox-variant die steunt op een infrastructuur van verborgen
servers. Door de nadruk op anonimiteit zijn er nadelen: Tor is relatief
stroperig en gezien alle mogelijkheden bewerkelijk om in te stellen.
Daar
komt bij dat de browser geen onverdeeld positief imago heeft. Tor biedt
namelijk toegang tot het ‘Dark Web’ en is daardoor geliefd bij volk dat
daadwerkelijk wat te verbergen heeft, neem misdadigers of mensen die
zoeken naar wapens of kinderporno.
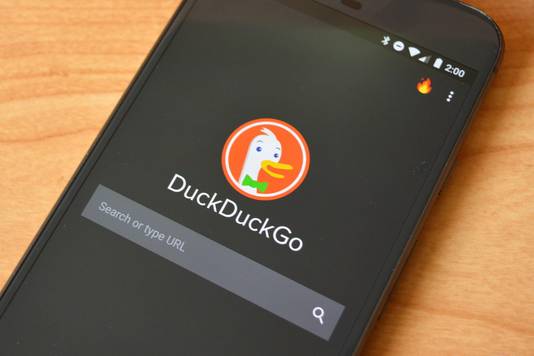
Alternatief voor Google Search: DuckDuckGo.
Wint
langzaam aan populariteit als het privacyvriendelijke alternatief voor
Google’s befaamde zoekmachine. DuckDuckGo deelt geen informatie met
adverteerders, houdt geen zoekprofiel van je bij en geeft dan ook geen
gepersonaliseerde zoekresultaten. Iedere gebruiker krijgt exact dezelfde
zoekresultaten te zien op een bepaalde zoekterm.
Nadeel
is dat DuckDuckGo voorlopig nog niet het niveau van Google heeft, dat
uiteraard veel diepere zakken heeft. DuckDuckgo steunt trouwens voor een
flink deel op Microsoft’s Bing, maar graast ook andere bronnen af om de
zoekresultaten te verbeteren. Daaronder Wikipedia, ook heeft DuckDuckGo
ook eigen zoeksoftware.
In de video hieronder vertelt Joas Hoogendijk (21) uit Amersfoort dat hij het liefst Hyves nieuw leven wil inblazen.
Bonus #1:
Here a link to “The Confidence Factor." It’s a test I created to help you
determine how confident you are – and how to build that confidence even
more.
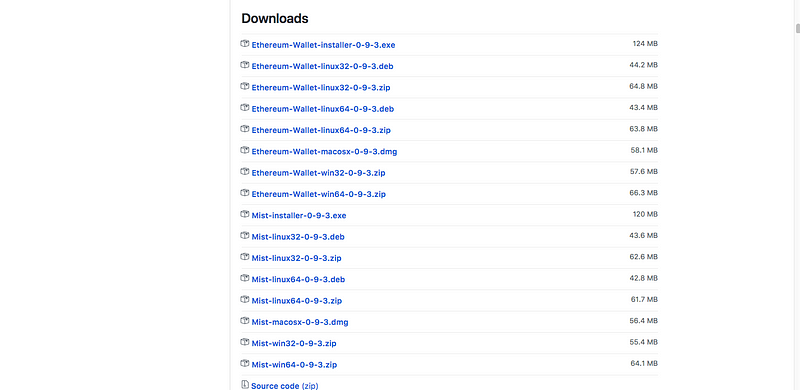
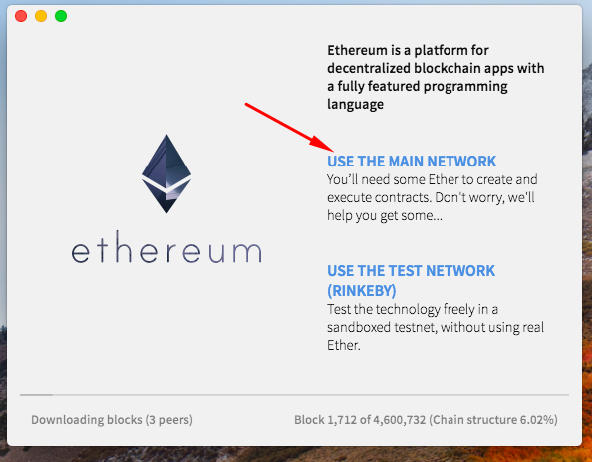
Obirum ICO: How to create an Ether wallet supports ERC20 and get ETH
Prior
to starting with the exact steps we would like to highlight that
payments without data or gas limit fields are rejected. Also, do NOT
send Ether from an exchange. Use MyEtherWallet, MetaMask, Mist wallets,
or other ERC20 compatible ones.
First
of all you need to have an Ether wallet. Creating an ether wallet is a
must in order to participate in the crowdsale and receive your tokens.
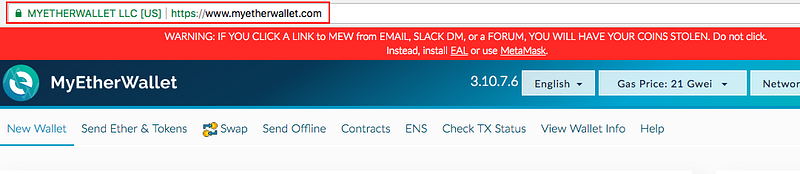
Option 1: MyEtherWallet
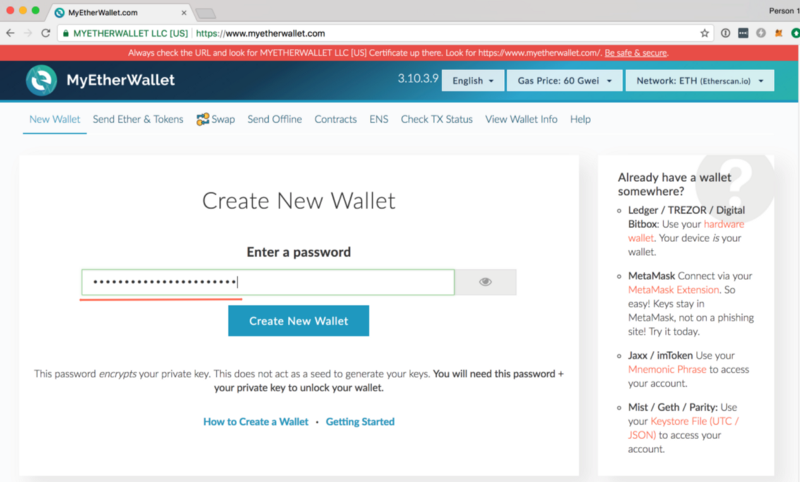
STEP 1: Go to https://www.myetherwallet.com/ and make sure the URL is correct and MYETHERWALLET LLC [US] certificate is there.
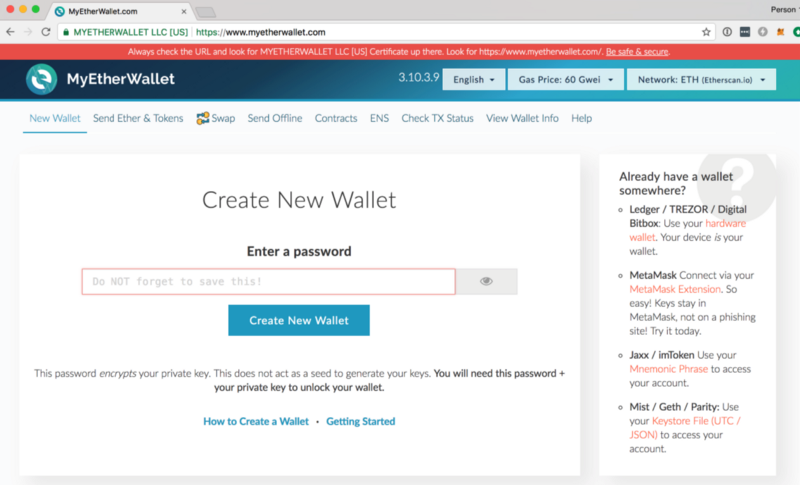
STEP 2: Go to the “New Wallet” Tab
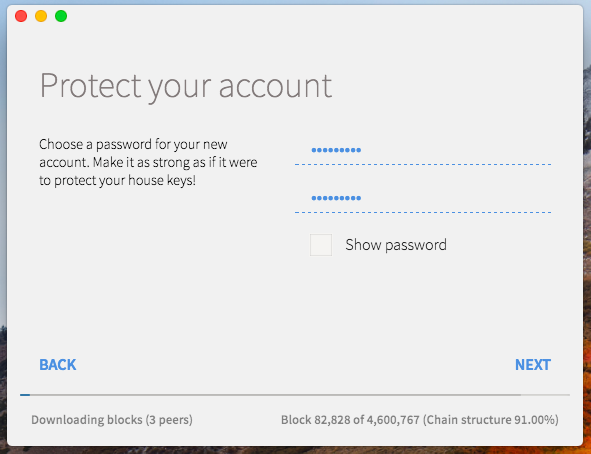
STEP 3: Enter a Strong Password
Enter a password that will be used to access your wallet:
1. Create a strong password, using upper and lower-case letters, and also numbers and symbols (e.g., “#”, “@”, etc.).
2. Do not lose this password. Losing this password is equivalent to losing all ETH and OBR stored in your account. Click on the Create New Wallet button.
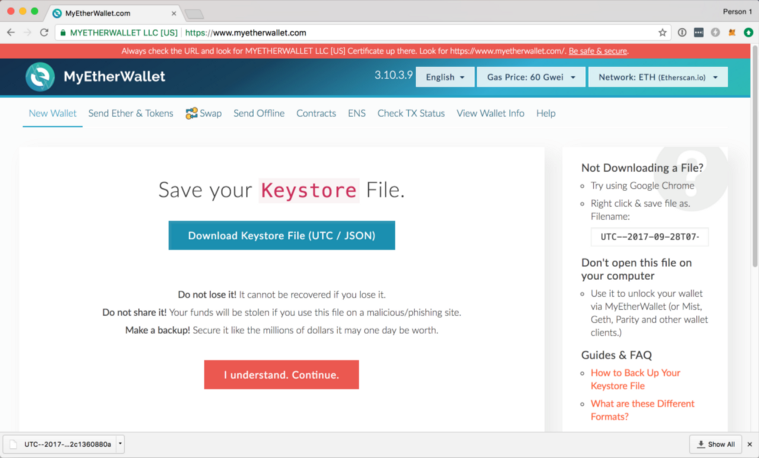
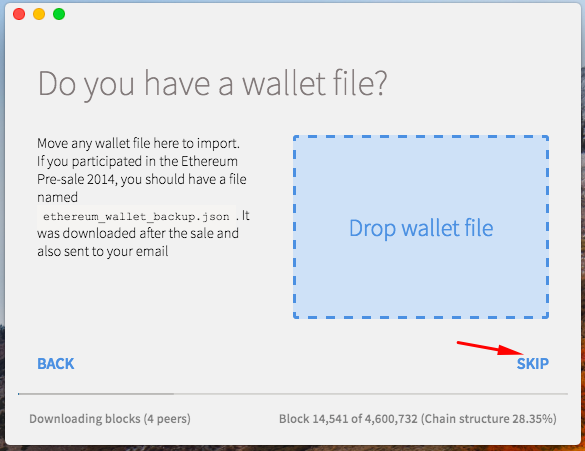
STEP 4: Save Your Keystore File
This file contains your private and public keys and is required every time you want to access your account.
NOTE:
you won’t be able to access your account without this file and the
password from the previous step. Losing either one of them is equivalent
to losing all ETH and OBR stored in your account.
STEP 5(optional): Backup Your Private Key
If you would like to make this account accessible by other Ethereum wallets, you can export and backup your private key.
You
should never share your private keys with anyone else. If your wallet
address is the equivalent of your bank account number, then your private
wallet key is your PIN. If anyone obtains your private key, they will
have access to all of your funds.
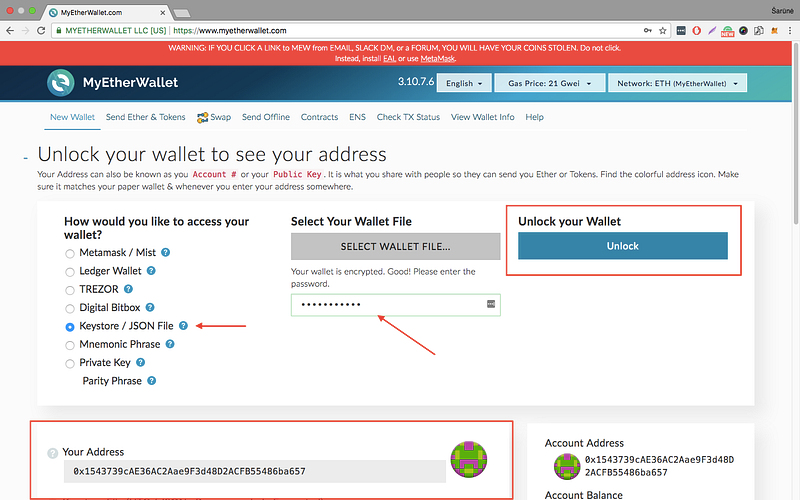
STEP 6: Unlock Your Wallet to View the Public Address
Follow the instructions to unlock your wallet and get your public address:
Select the Keystore File (UTC / JSON) and select the keystore file you’ve downloaded in the previous step.
Input the password you set on step 3 and click on the Unlock button to unlock it.
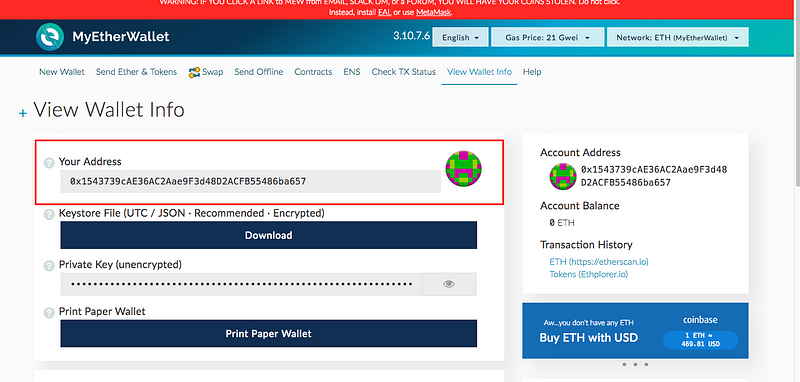
STEP 7: Save Your Public Address
Now that you have created the wallet you should now be able to see your Ethereum public address under the Your Address label or the Account Address section.
You will need to provide this public address during your registration for the Obirum token sale.
You will need to provide this public address to transfer ETH to your wallet.
Do not lose your password and the keystore file, as you will need to use them in the Obirum token sale.
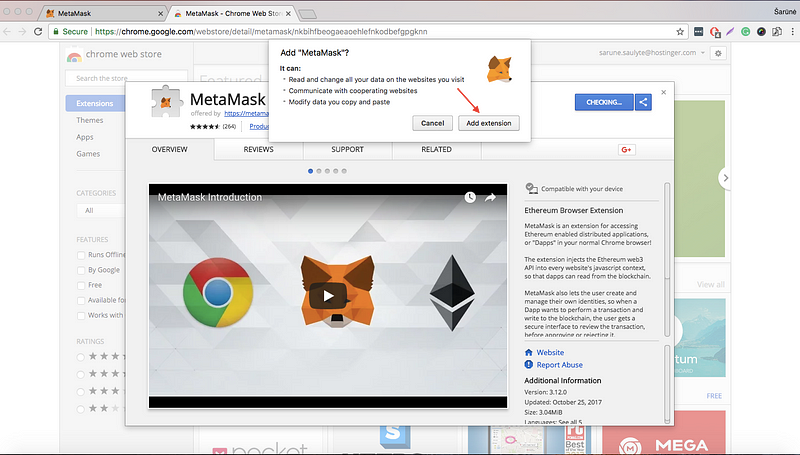
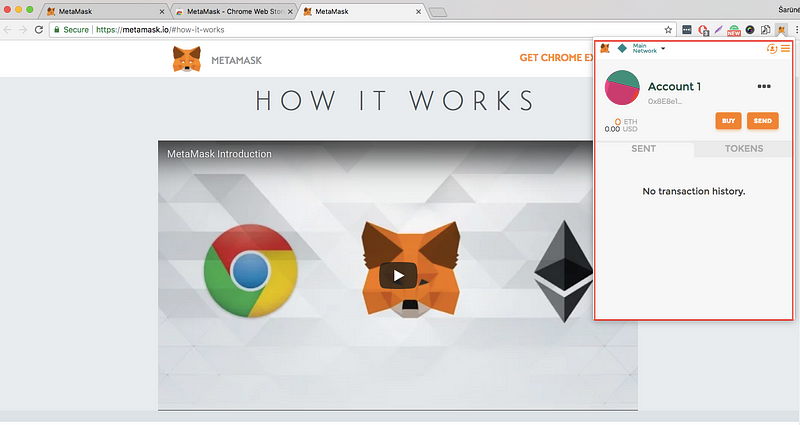
Option 2: MetaMask
(Note: if you already have MyEtherWallet, you may skip this alternative option and proceed with the Section 2.)
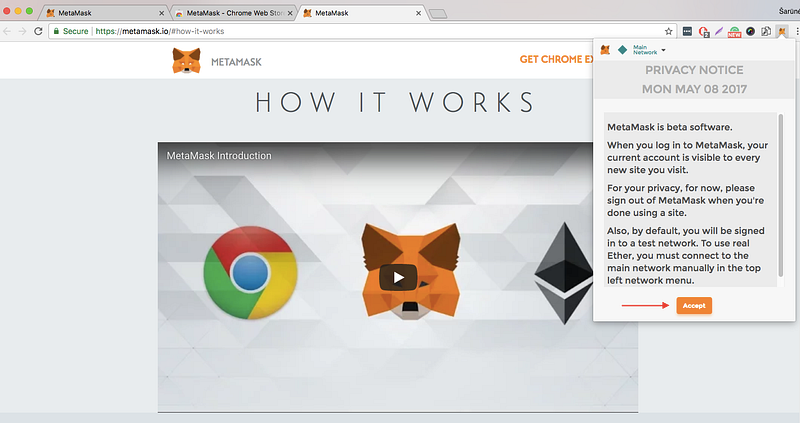
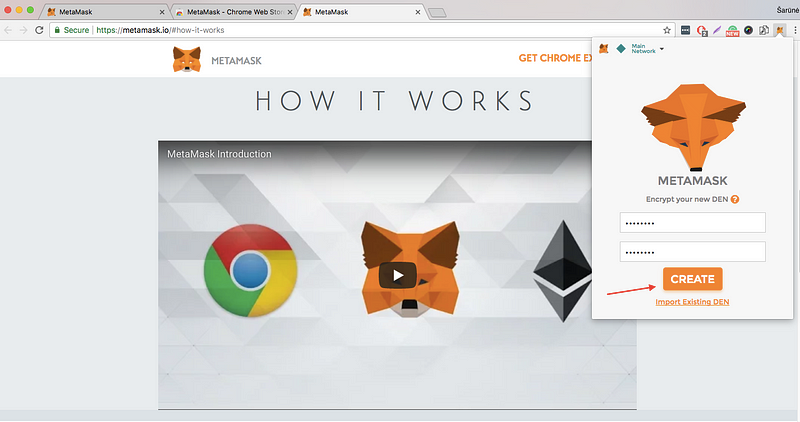
MetaMask is a plugin for Google Chrome browser. It can be downloaded and installed from metamask.io
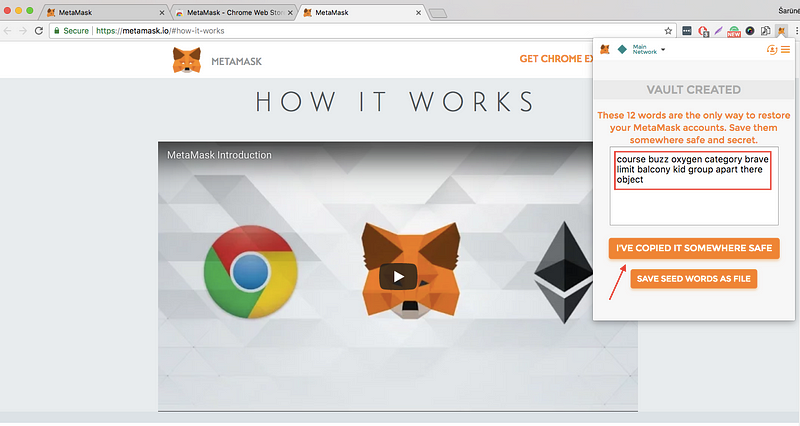
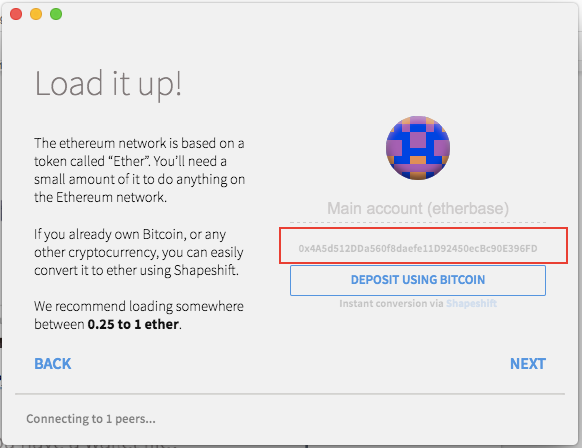
STEP 5: Your Main Account address is here. Be sure to write it down
STEP 6: Click NEXT and wait for download.
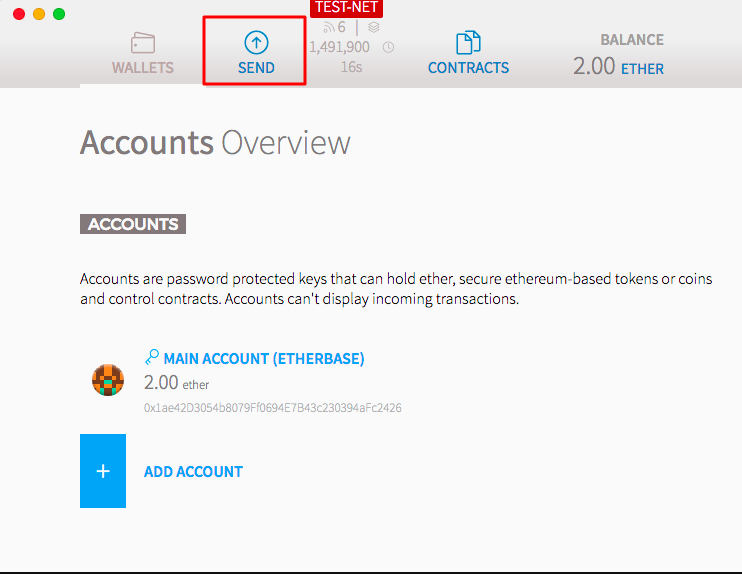
STEP 7: Here is the account overview screen you will see once the download is complete, you can use SEND to send Ether. To receive the ether from other party, simply share the address from Step 5.
You will need to provide this public address during your registration for the Obirum token sale.
You will need to provide this public address to transfer ETH to your wallet.
Do not lose your password and the keystore file, as you will need to use them in the Obirum token sale.
2. How to get Ethereum and transfer it to your wallet:
There are a few ways to get Ether. We suggest using one of the following:
- Purchasing by bank transfer,
- Purchasing by Credit Card,
- Exchanging Bitcoin or other cryptocurrency.
We suggest using Cex.io or Kraken.com as their interface is really easy-to-use.
NOTE: Kraken.com does not accept transfers from Credit Card.
Option 1: (pay with crypto, bank transfer) — Kraken.com
PART 1 — Getting ETH
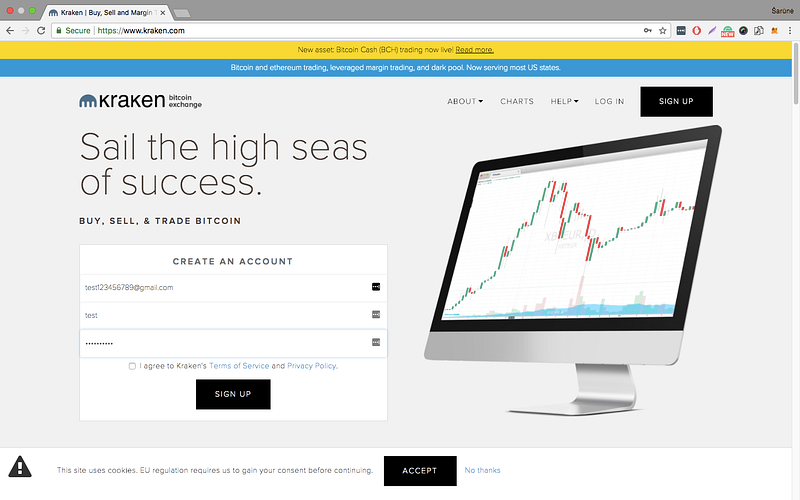
Step 1: Create
an account by entering your email, selecting a username and a secure
password. Click on the black sign up box in the right corner:
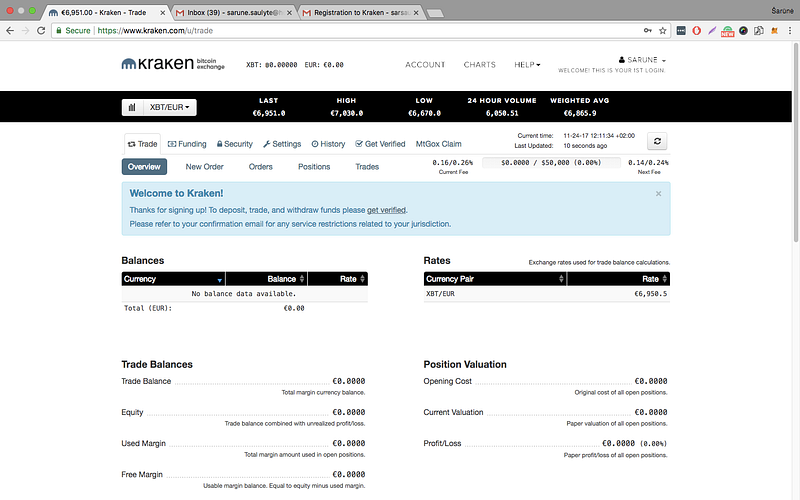
Step 2: You’ll receive an email confirmation letter. Once your account is confirmed log in. Your screen should look similar to this:
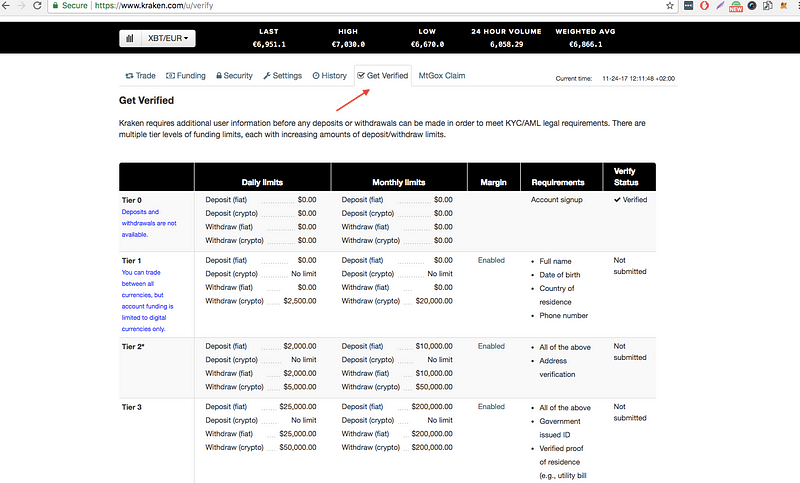
Step 3: Now you must verify your personal information. You can do that by clicking on Get verified.
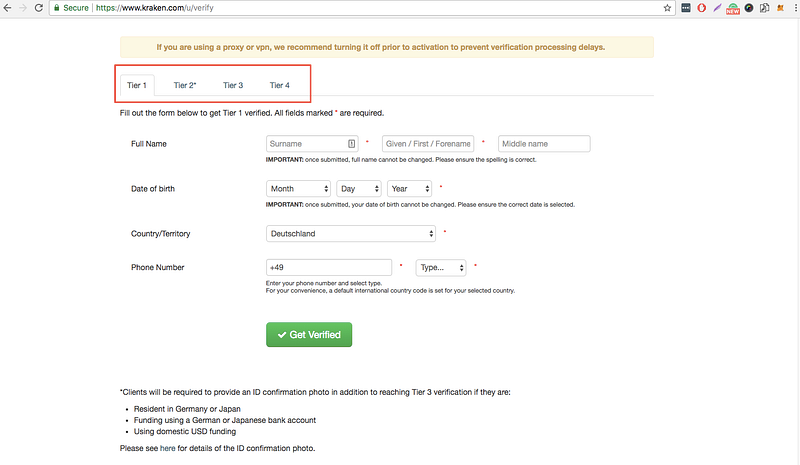
Step 4: Select the applicable Tier and verify your identity. It usually takes up to 2–3 days.
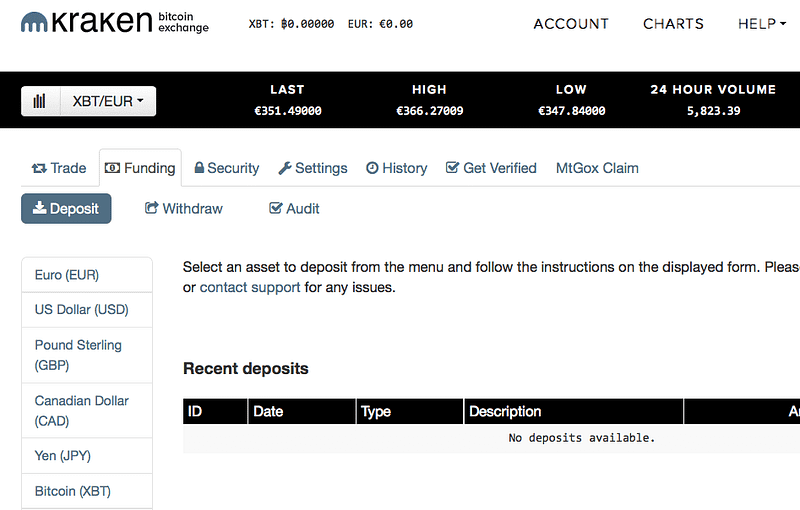
Step 5: Once your account is verified, go to the Funding tab. Select your funding method from the left side and deposit the desired amount of selected currency.
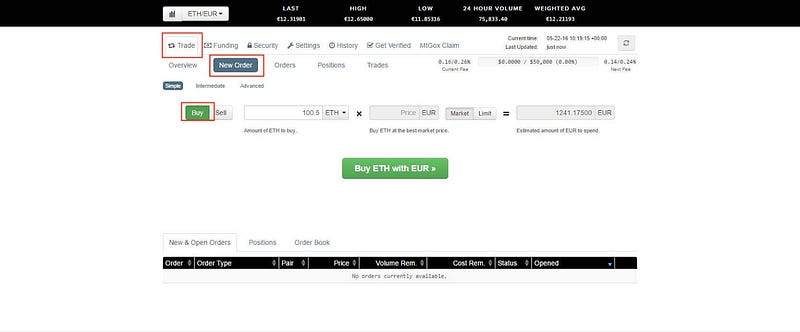
Step 6: Once your account is funded, select Trade and New Order to place orders. Note that the currency pair you select plays a role in determining what is bought. Select the BUY button and choose a currency pair x/y, then currency x will be bought and currency y sold.
Step 7: Enter the desired amount and press Buy x with y.
PART 2. Transferring ETH to your wallet
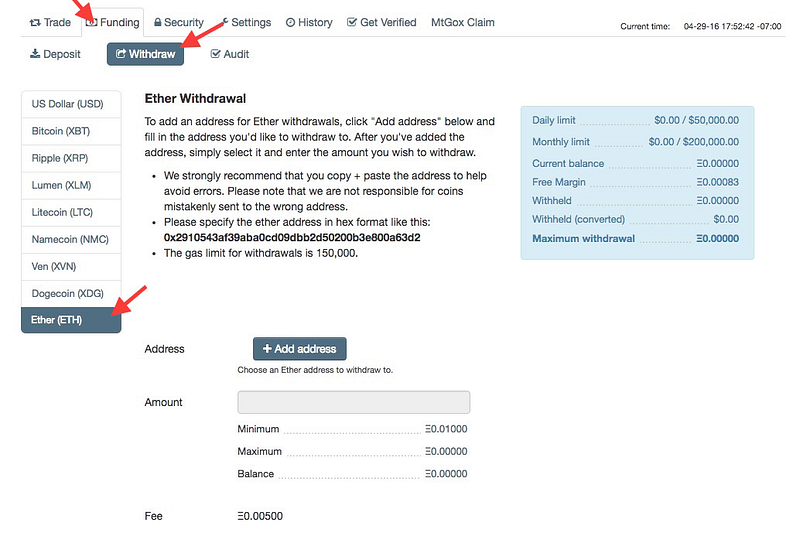
Step 1: Login to your account and go to Funding tab. Select Withdraw. Press on Ether (ETH).
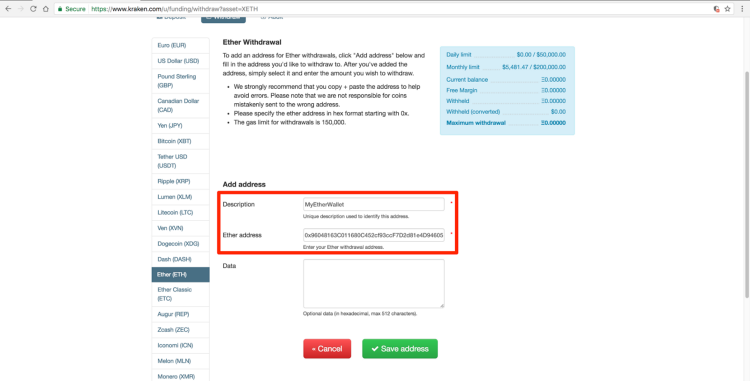
Step 2: Click on +Add address. Add a description and your Ether wallet address. Save it and click the Back button.
Step 3: Select the address you just created from the dropdown. Enter the amount. →Review Withdrawal → Confirm Withdrawal.
Once the Initiated status changes to Success you can access your Ether wallet and see the balance.
Option 2: (pay with crypto, credit card, bank transfer) — Cex.io
In
this tutorial we will show how to exchange money from your credit/debit
card. Making a bank transfer or exchanging a cryptocurrency process is
similar.
Part 1. Getting ETH
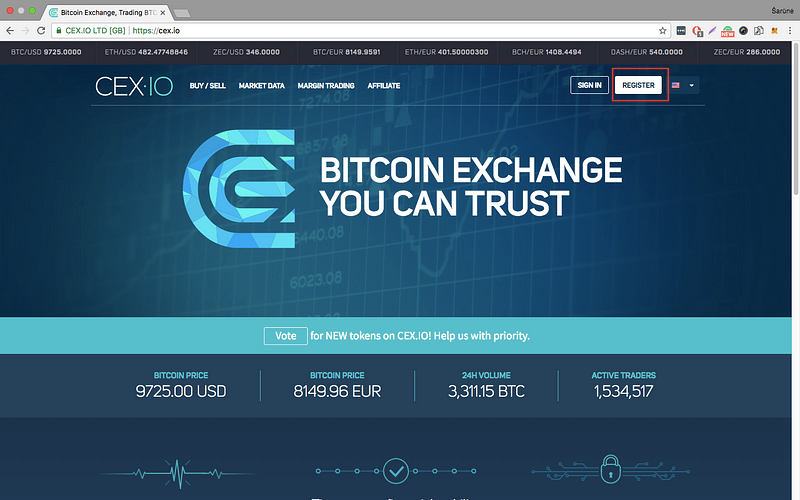
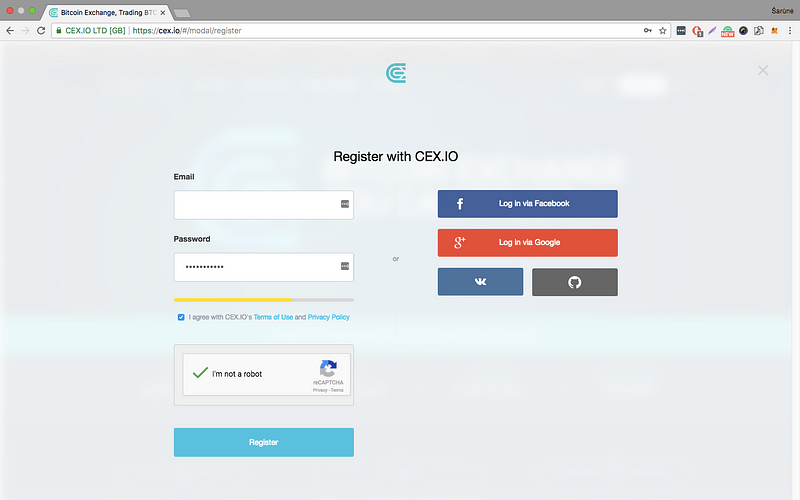
Step 1: Go to Cex.io and press REGISTER
Step 2: Sign up with your email and choose a secure password. You can use an alternative way from the column on the right:
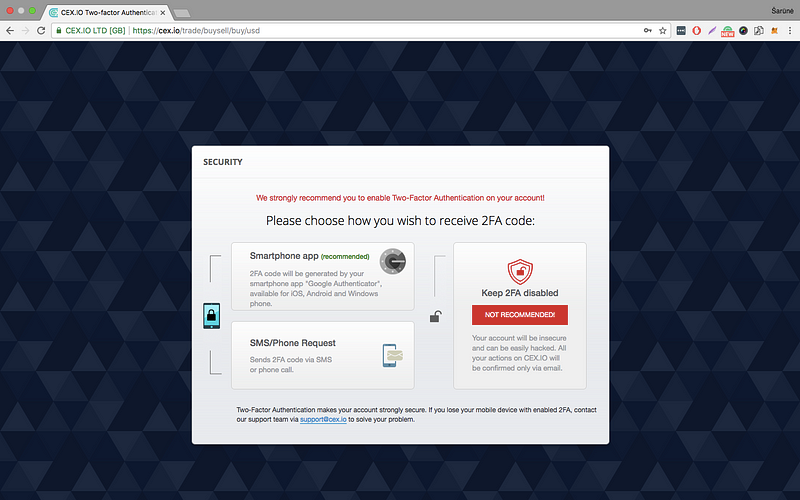
Step 3 : Select 2-step verification method to increase security.
Step 4: Confirm your email.
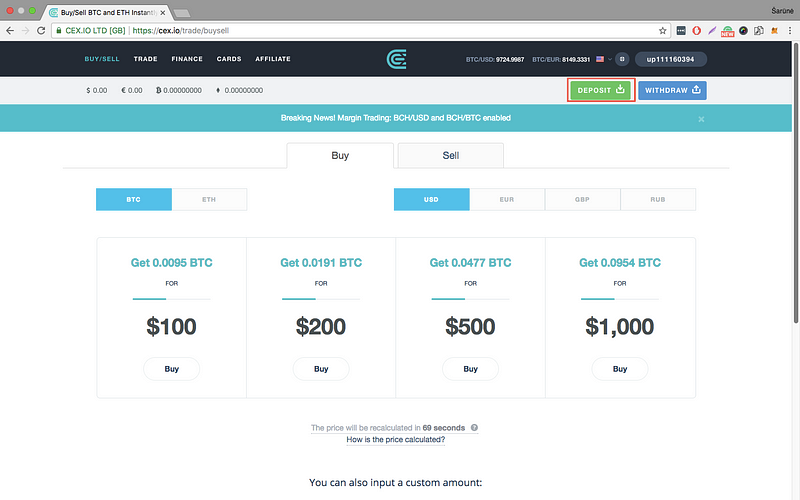
Step 5: Once you confirm your email you should see a screen similar to this one. Select DEPOSIT.
Step 6. Select Payment card and press Add a new card
Step 7: Enter your card details, take two selfies as described in the instructions. Enter the CVV of your card and get it verified.
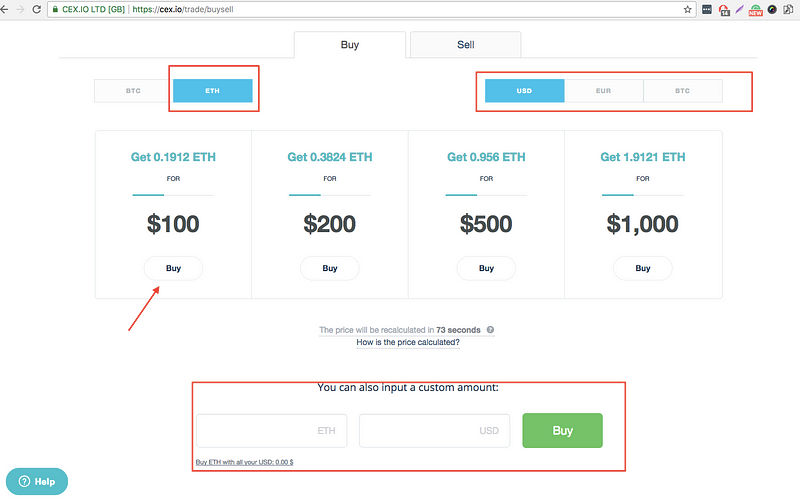
Step 8: Once you verify your card go to BUY/SELL. Select ETH and the currency of your card. Choose an amount from the list or enter a custom one and press BUY.
NOTE: The
fee on Deposit and Withdrawal varies for various Debit/Credit card as
well as the fiat currency. Make sure that you go through the fee structure prior to making the final payment.
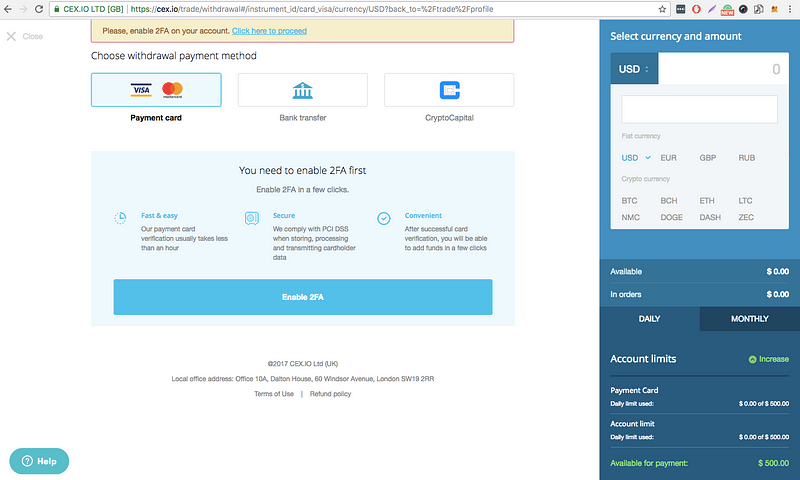
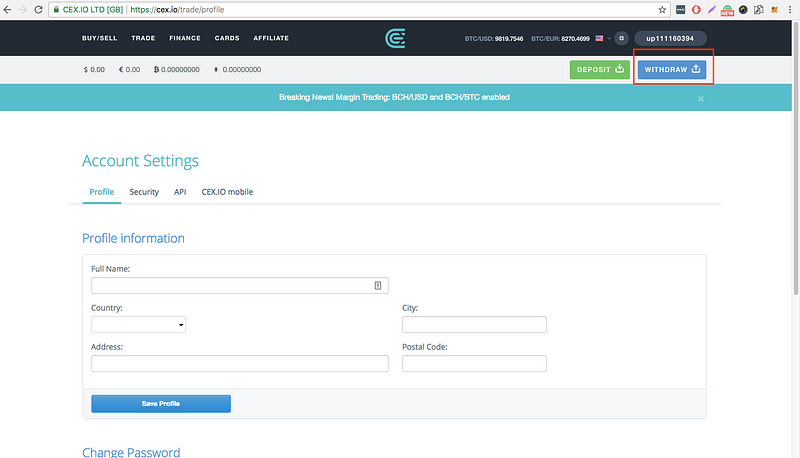
PART 2. Transfer ETH to your wallet
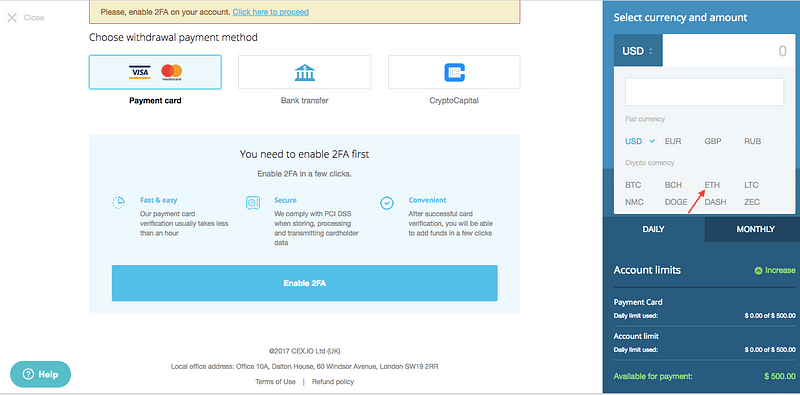
Step 1: Log in to your account and select WITHDRAW
Step 2: Select ETH from the drop down menu and enter the desired amount.
Step 3: Add your Ethereum wallet address and transfer ETH to your wallet.
Access your Ether wallet and see the balance. Note that transactions may take some time.